Disclosure: The content on this site is free. Some of the links below are affiliate links from companies like Amazon.com and if you click the links and make a purchase we will receive a small commission at no additional cost to you. Thank you in advance if you decide to support our site by using our affiliate links!
The Snowflake Method by Randy Ingermanson
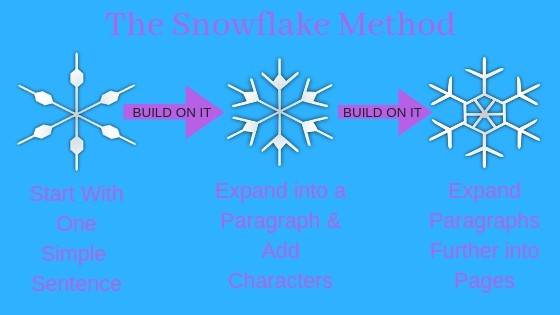
Here is a simple visual presentation of the Snowflake Method by Randy Ingermanson. If you want to read the Snowflake Method- Get it on Amazon (Affiliate Link).
How to Outline a Novel with The Snowflake Method -Overview
At the highest level, the Snowflake method can be understood by knowing that you start your outline with one simple sentence.
This one sentence should describe the essence and core theme of your novel. An example of a sentence that reflects the central theme of your novel would be something like this for my first book, Noble Origins in The Omega Conspiracy Series: “A rogue faction within a global shadow group charged with protecting humanity from itself suddenly threatens to incite a cataclysmic event like the world has never seen.”
The snowflake method then walks you through a systematic process to layer on top of your initial sentence to expand your idea into a full-fledged outline and novel. You add different key story elements and expand each outwardly into a paragraph and eventually full pages to develop your full story Snowflake.
You can see Randy Ingermanson describe the snowflake method to Joanna Penn on her Creative Penn Youtube Channel below.
Pros and Cons of Outlining with the Snowflake Method
Pros
- This method is easy to understand and follow.
- It allows the writer to fully develop the key elements of their story in a way that constantly builds on previous steps, leading to inherent continuity.
- Allows you to start with the one sentence elevator pitch and expand from there, which will make it easier to write your book description and marketing once your book is published.
- Has a different feel to the outlining process which might be a great alternative for writers that want to outline but still find their current methods unenjoyable.
- Once completed, you should more than make up the time spent outlining with time saved, while writing by limiting writer’s block.
Cons
- A little different to more traditional outlining methods, so while it is easy to understand it may take a little while to get used to.
- The Snowflake method predicates itself on allowing you to fully develop your story before you start writing, which might feel difficult for writers that don’t like spending a lot of time on story development.
- Probably not the best option for impatient writers that hate outlining.
Step By Step Guide To Outlining Your Novel with the Snowflake Method
In this section, you will learn exactly how to outline your novel using the Snowflake Method with a 10 Step Tutorial.
Here are the 10 Steps to outlining your novel with the Snowflake Method:
- Write a one-sentence summary of your novel
- Expand your sentence into a paragraph that includes narrative, major events, and ending
- Write Summary for Main Characters
- Expand Paragraph in Step 2- Each sentence into a paragraph
- Write One Page Description for Main Characters
- Expand your one-page story synopsis into a 4-page synopsis
- Expand character descriptions into full character charts
- Use story synopsis to make a full list scenes
- Use scene-list to create a multi-paragraph narrative of each scene
- Write your first draft
Let’s take a closer look at each step in the Snowflake method steps listed above.
Step 1: Write a One-Sentence Summary of your Novel
Remember this should be the central theme or story concept to your novel. While it is only one sentence long, make sure to take enough time to craft a good sentence that really gets at the heart of what your novel is about.
Remember the example above from my first book, Noble Origins in The Omega Conspiracy Series: “A rogue faction within a global shadow group charged with protecting humanity from itself suddenly threatens to incite a cataclysmic event like the world has never seen.”
Hint: Don’t use character names at this point, but you can use character descriptors.
Step 2: Expand your sentence into a paragraph that includes narrative, major events, and ending
When expanding your first sentence into a full paragraph consider your story structure. A simple formula for this paragraph can consist of:
- Sentence 1: The Setup of the story
- Sentence 2-4: Each of the key turning points
- Sentence 5: The conclusion of the story.
Step 3: Write One-Page Summary of Characters
This is all about character development. On this summary, you want to consider some of the most important questions that need to be answered to understand your characters.
Here are some examples of questions to ask your character when writing this summary page:
- Include one sentence of the character’s storyline
- What is the character’s motivation?
- What is their primary goal?
- What is the conflict they will face?
- What will be their mirror moment or turning point?
- Expand one-sentence description of storyline to a full paragraph
Read our article on 100 Questions to ask your character Here.
Step 4: Expand Paragraph in Step 2- Turn Each sentence into a paragraph
Remember the Snowflake method consists of taking a simple idea and expanding it into a full novel. In this step, you want to take each sentence in the paragraph you wrote in Step 2 and turn it into a full paragraph.
Randy says this step is critical and you should not be afraid to spend a few hours developing these paragraphs. Remember to build in a disaster or Pinch point at the end of each of the paragraphs to make sure your novel will continuously raise the stakes and move forward.
This is for each paragraph except for the final one which should tell you how your book ends.
Step 5: Write One Page Description for Main Characters
Go back to step 3 and make sure you build out at least a full page for each of your characters, add everything that is important about each of your character.
One of the ways you can do this is to write each page from the perspective of that character so you can really build out how your character views and interacts with the events of the story.
Step 6: Expand your one-page story synopsis into a 4-page synopsis
Go back to one-page synopsis you wrote in step 4 and expand each paragraph into a full page to build out a more substantial synopsis and make sure you include and plot issues. By the end of this step, you should have your story flowing well.
Step 7: Expand your character descriptions into full character charts
In this step, it’s time to go back and build out complete character charts for each of your characters. You can’t know too much about your characters.
You can try to interview each of them using our character development sheet. But you should really understand everything important in your character’s past, present, and future lives by the time you are done with this step.
Step 8: Use story synopsis to make a full list of scenes
You are now ready to plot out your novel. Use your story synopsis to create a full list of scenes. A full-length novel can have somewhere between 50-100 scenes in it.
Plot out every scene in your novel with a one-sentence description of the scene.
Step 9: Use your scene-list to create a multi-paragraph narrative of each scene
In this step, you want to flush out your one-sentence scene descriptions into full paragraph narratives. Include key information for the scene:
- Which characters are in the scene
- Where does the scene take place
- What happens in each scene
It may also be helpful to include other information about why the scene is important to the overall novel:
- What is the goal of the scene
- Point of view of the scene
- Why is the scene important
Step 10: Write Your First Draft
You are ready to start writing the first draft of your novel. If you have worked your way through the entire Snowflake method, you will most likely find your first draft is a bit easier to write than in the past.
You have already done a lot of writing, and in doing so you have already done a lot of thinking and problem-solving in the pre-production portion of your novel using the Snowflake method which means your story should flow rather nicely at this point.
Also, feel free to jump from scene to scene if you that will help you. Scrivener makes this very easy, read more about how it can help you organize your writing.
FREE SNOWFLAKE METHOD SCRIVENER TEMPLATE
If you are looking to use this outline templates, you can do so more easily by downloading our free Scrivener Templates Below.
Note: You will need Scrivener to use it. If you don’t have Scrivener you can Get Scrivener Here.
Or find out Why Scrivener is the Best Writing Software for Writers Here.

How to Outline a Novel Conclusion
I hope that these 5 examples of how to outline a novel have given you a few different ways to approach your next writing project.
There are many more ways to outline a novel and we may add to this guide over time. If you don’t like any of these outlining options, here are a few other ways to outline you can check out:
- The Master Plot Formula
- The Story Beats Method
- The Story Grid Method
- Writing into the Dark
The important thing is that you find an outlining method that works best for you. Learn and use the method that works best for you and adapt it where it falls short.
Thank you for reading and more importantly Writing!
