Step 4: Installing WordPress on Your Author Site

In the previous step, you selected a domain name and signed up for hosting with ” target=”_blank” rel=”noopener noreferrer”>Bluehost. In step 4 of this author site building tutorial, it’s time to install WordPress.
Luckily as we said earlier, one of the reasons I recommend ” target=”_blank” rel=”noopener noreferrer”>Bluehost, is because of how easy they make to install WordPress onto your website. I won’t rehash all the reasons WordPress is the best content management system out there for building blogs and websites. Which is exactly what writers and authors need to do.
STOP HERE AND REGISTER A DOMAIN AND HOSTING ACCOUNT WITH BLUEHOST BEFORE PROGRESSING FURTHER
Now Let’s walk through installing WordPress on Bluehost for your new Author Site.
- Step 1: Log in to your Bluehost cPanel Account
- Type in your primary domain and password
- Step 2: This will put you into your Bluehost cPanel. Find the Website Section
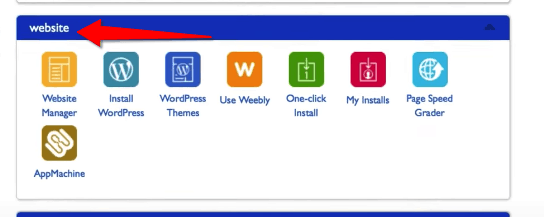
Find Website Section of Bluehost cPanel to Install WordPress on Your Author Website
- Step 3: Click on WordPress Icon
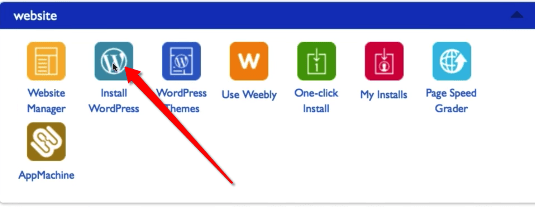
Click on WordPress Icon
- Step 4: This will take you to the Mojo Marketplace. Click the Install Button on the Do it Yourself Free option for WordPress. CLICK INSTALL
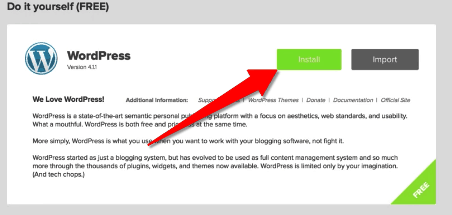
One Click Install of WordPress on author site
- Step 5: Select the Domain You want to install WordPress On. If you only have the domain you just registered you still need to select it.
- Click Check Domain
- **Hint: Leave the Directory Section Blank if you want your domain home page to be the domain name. ie. www.domain.com, if you want it to be something like www.domain.com/blog then type blog in the directory. I recommend leaving it blank when setting up your WordPress site.
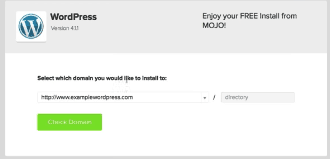
Select the right Domain when installing WordPress on Bluehost
- Step 6: Once Bluehost is done checking the domain to make sure nothing was previously installed on it., it will pull up the following screen. CLICK show advanced options to Set up Site Name and Change Admin Name and Password. Make sure you change and Save this!!!!

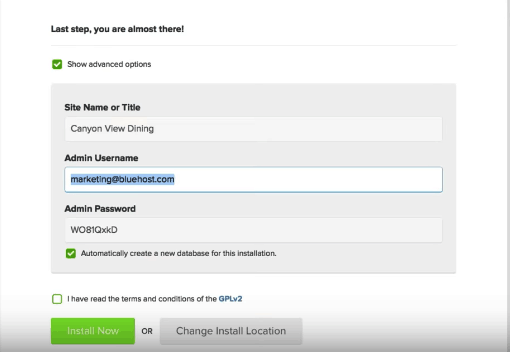
Set Site Name and Change Admin Name and Password
- Step 7: Agree to the Terms By Checking the Box and Click Install Now
- Step 8: A Window may appear suggesting themes, just Close out of that. We will cover themes in the next step. YOU ARE DONE!! CONGRATS!
If you want to watch a walkthrough of the steps we just covered. Watch the Video Below.
You are really rolling. So far you’ve:
- Mapped out your site
- Selected a platform to build your website on
- Chose and Registered a Domain
- Signed up for Hosting
- Installed WordPress as a content management system for your Author website.
If you are ready for the next step, click the button below.
